| « 2022-03-19 | Tinkering | 2021-07-28 » |
Tinkering: 2021-11-06: Face Shield with Glasses
For dusty work like cutting or sanding wood or, in a current project, sanding glass for the next two alarm clocks, I wanted to improve my protective gear. This turned out to become a nice little project on its own, as I made a 3D printed pair of glasses to install into my new face shield.
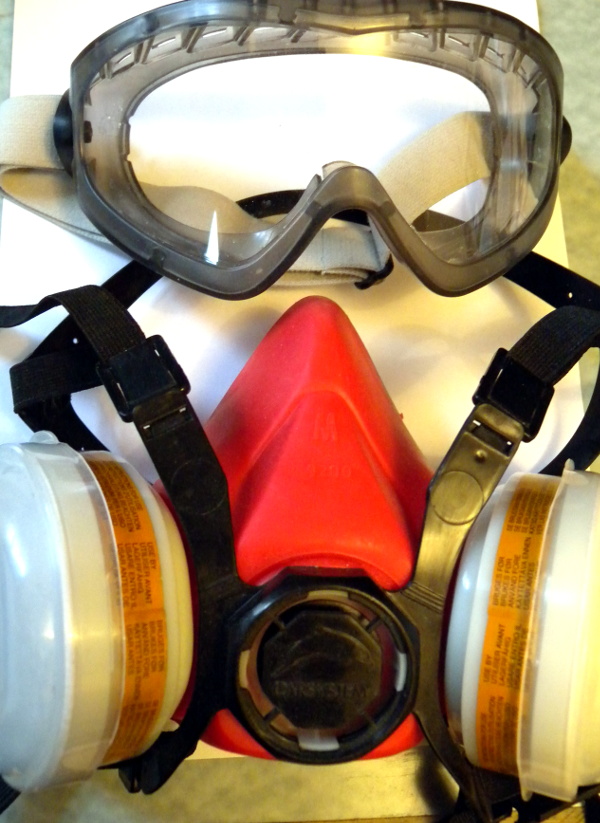 So this is my previous protective gear: a good respirator and protective
goggles. The respirator is very good, but the goggles are OK for a few minutes
only. Firstly, I cannot really wear glasses with them as they start to hurt
in a few places where it's just too much uneven pressure on my face. Also, the
goggles are not super air-tight with the respirator blocking where it really
wants to sit. And then the worst of all, it fogs up within minutes – it is
not unheard of that I might sweat when working, and it fogs up even if it
feels like I am not sweating.
So this is my previous protective gear: a good respirator and protective
goggles. The respirator is very good, but the goggles are OK for a few minutes
only. Firstly, I cannot really wear glasses with them as they start to hurt
in a few places where it's just too much uneven pressure on my face. Also, the
goggles are not super air-tight with the respirator blocking where it really
wants to sit. And then the worst of all, it fogs up within minutes – it is
not unheard of that I might sweat when working, and it fogs up even if it
feels like I am not sweating.
So this is suboptimal at best.
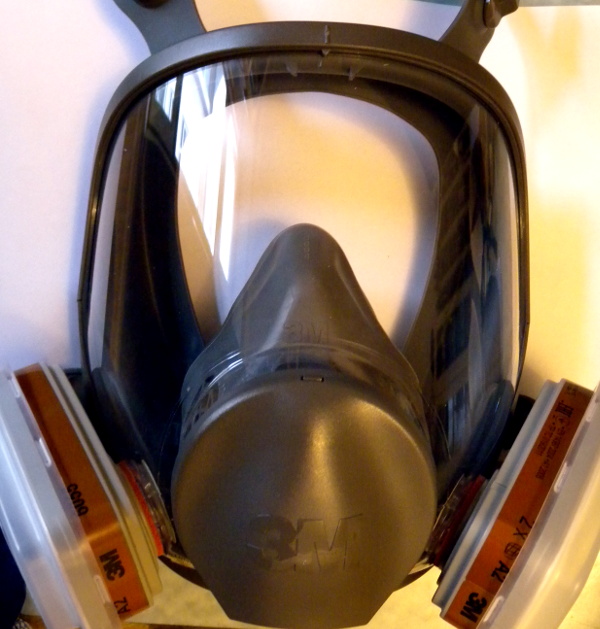 I went ahead and got myself this face shield with integrated respirator. Sure,
it's quite a bit more expensive, but it is a massive improvement. The first time I
tried it, I was delighted by the comfortable fit, the air-tightness, and that it
wouldn't fog up at all. The view is very clear (so let's try to not scratch the
screen...). The air is channeled from the filter through the space
in front of the face into the mouth piece so that there is a constant flow of
air in front of the face. This succeeds in preventing any fog-up.
I went ahead and got myself this face shield with integrated respirator. Sure,
it's quite a bit more expensive, but it is a massive improvement. The first time I
tried it, I was delighted by the comfortable fit, the air-tightness, and that it
wouldn't fog up at all. The view is very clear (so let's try to not scratch the
screen...). The air is channeled from the filter through the space
in front of the face into the mouth piece so that there is a constant flow of
air in front of the face. This succeeds in preventing any fog-up.
But this face shield does not allow me to wear glasses at all – it becomes leaky, and there is a lot of pressure on the frame of the glasses.
 But I noticed that there is enough space for a frame for glasses inside
of the face shield. 3M sells such a frame for this mask, but
it might not be available in Germany, and even if I could get it, it is way more
expensive than the face shield itself, and it is just some plastic and a wire.
Naturally, I opted for more fun: designing this myself and 3D printing it!
But I noticed that there is enough space for a frame for glasses inside
of the face shield. 3M sells such a frame for this mask, but
it might not be available in Germany, and even if I could get it, it is way more
expensive than the face shield itself, and it is just some plastic and a wire.
Naturally, I opted for more fun: designing this myself and 3D printing it!
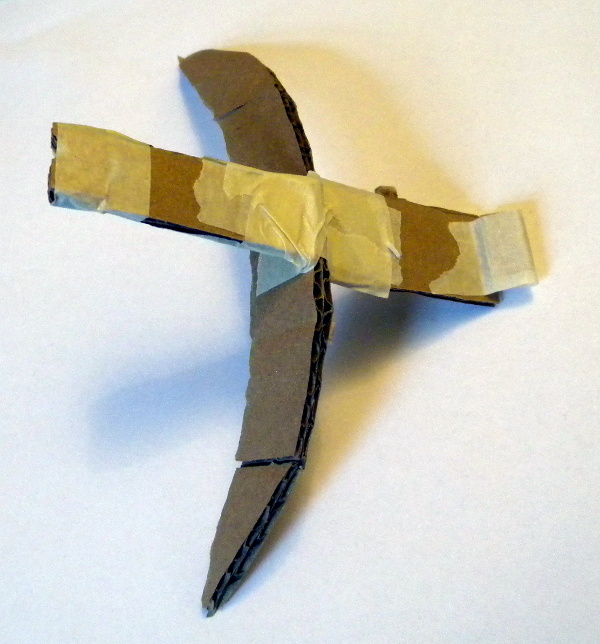
This is the first cardboard mockup to learn about the basic geometry: curvature of the shield, position of eyes, and height of the shield for the main anchor where the glasses' frame will be attached to the mask.
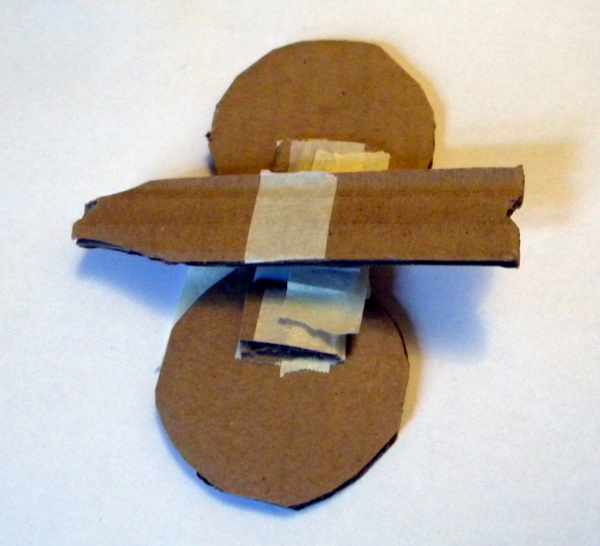 This is the second mockup that is good enough to start 3D modelling.
 And this is the first 3D printed version. It came out fine, but needed a few
tweaks, so more prints will follow.
And this is the first 3D printed version. It came out fine, but needed a few
tweaks, so more prints will follow.
In any case, this was good enough to pack the mask, the printed frame, some calipers, and head over to the optician to scare them. Well, they were not scared, they were actually very helpful in adjusting the geometry of the frame to clamp the lenses better, and in giving hints about improving the position of the glasses with respect to my eyes. In general, they were really happy to do this, and they told me it was a very welcome distraction from the 'usual' orders they have.
 This is the improved version after the discussions with the optician.
It is tilted more so it is closer to the face on the bottom – glasses are
this way, apparently. It also has an improved groove (which is not shown
in the picture) for
the lenses, and I made space in the straight mounting base to have a less
obstructed field of vision. The new base's shape follows the mouth piece's.
This is the improved version after the discussions with the optician.
It is tilted more so it is closer to the face on the bottom – glasses are
this way, apparently. It also has an improved groove (which is not shown
in the picture) for
the lenses, and I made space in the straight mounting base to have a less
obstructed field of vision. The new base's shape follows the mouth piece's.
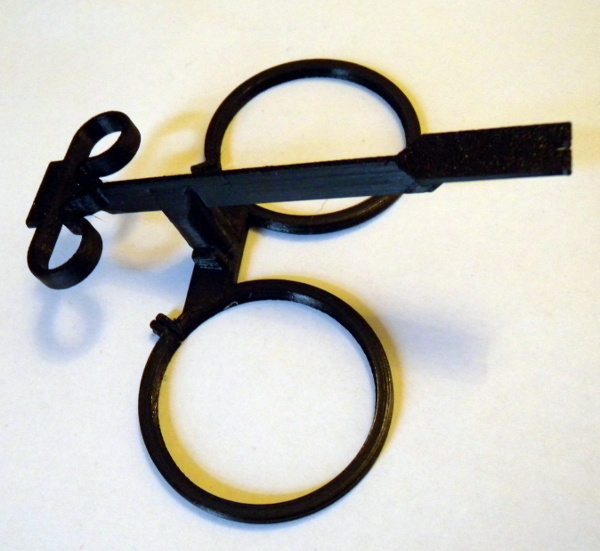
This also adds rings around the protrusions for clamping, i.e., where the bolts go – these protrusions did not print well because of the holes for the bolts: there was a 2x2mm column close to the hole that my printer was not happy about. If too little plastic is extruded, the result is not a clean plastic string, but more of an ugly blob. So the rings stabilise printing by letting the printer extrude more at a time, to get nice strings. These rings were meant to be cut off after printing, but I actually like their look, so they'll stay. Also, the position of the clamping knobs was moved, because they previously scratched my forehead.
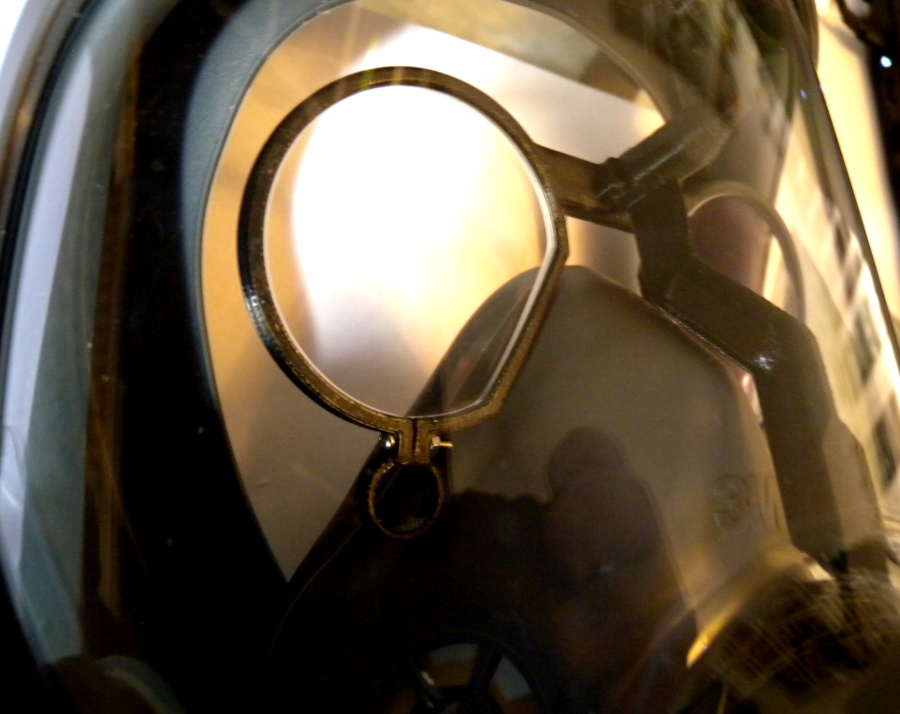
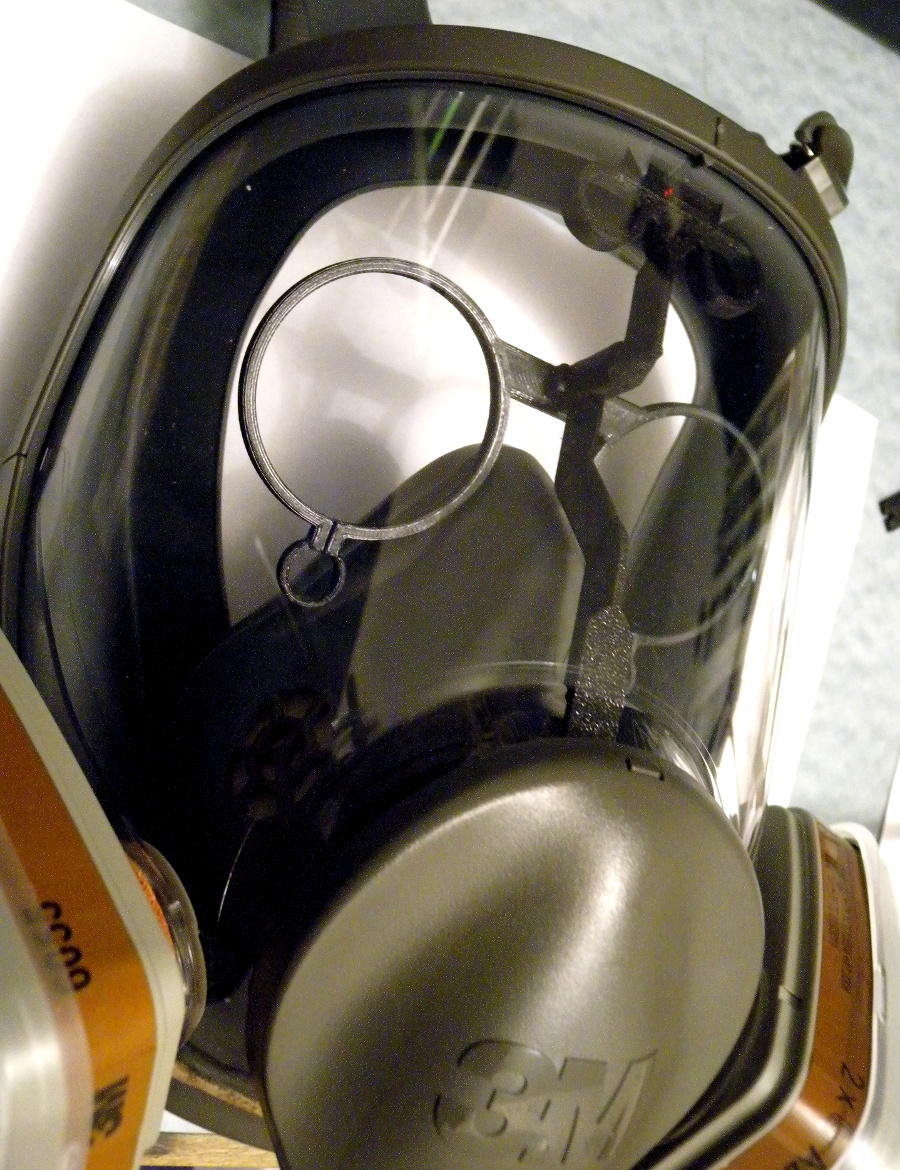 This is the frame inside the mask. I really like the look of the circular
shapes.
This is the frame inside the mask. I really like the look of the circular
shapes.
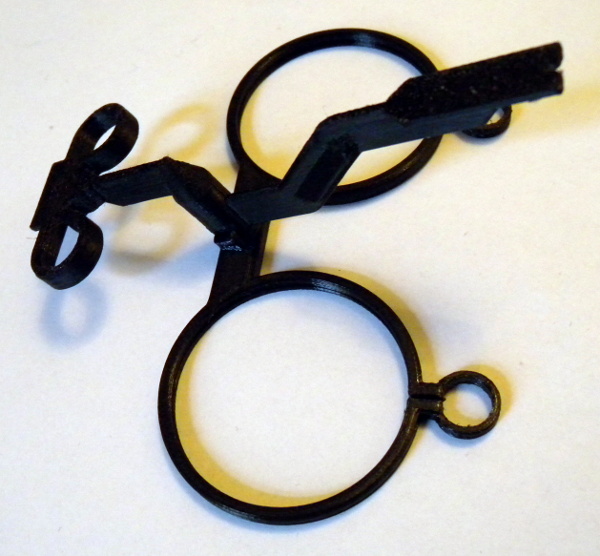
 In the previous iteration, I had already increased the distance between the
lenses so that there is more space for the nose. But it was still pinching,
so this is another iteration of the frame, with cut-offs along
the nose.
In the previous iteration, I had already increased the distance between the
lenses so that there is more space for the nose. But it was still pinching,
so this is another iteration of the frame, with cut-offs along
the nose.
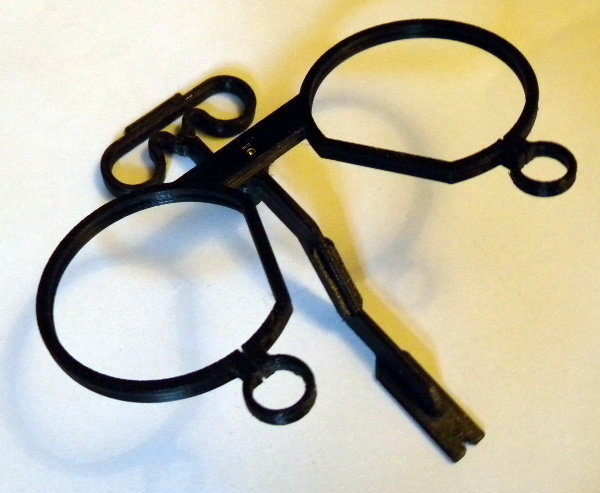
 So then I took the improved frame back to the optician to have some lenses
inserted. This is the completed mask, showing the glasses with the lenses.
So then I took the improved frame back to the optician to have some lenses
inserted. This is the completed mask, showing the glasses with the lenses.
 And this is the same thing at another angle.
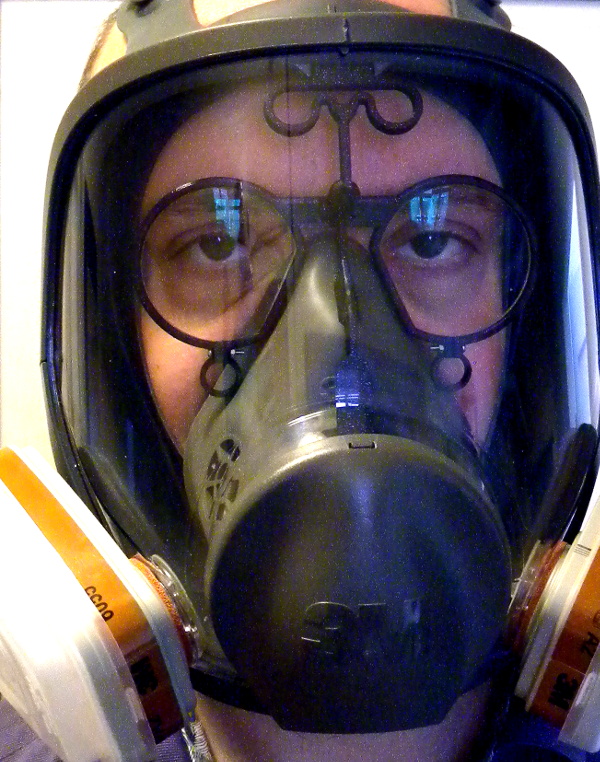 Haha, yes. Now I can start sanding and make a big mess, and I can still
breathe well, and can see the mess I made. Very nice, this is a big
improvement!
Haha, yes. Now I can start sanding and make a big mess, and I can still
breathe well, and can see the mess I made. Very nice, this is a big
improvement!
I really like the look of the circular shapes of the frame.